Make your video more alive!!!

How to make the video more YOU!!!
Manual recording
Do you know the secret to make your video more special besides owning spectacular scenes we talked last post? A LITTLE PIECE OF YOURS!
Hey, relax, we are not taking any piece of meat of yours. What we are talking about here is your voice! Adding your sweet or manly voice in the video make your video more interesting and personal, more than that, it will be a HUGE difference to any other. The tools you need are microphone and Gliastudio. Without import your voice recording, you can record your voice straight to the clip.
Let’s do it together with step-by-step instruction:
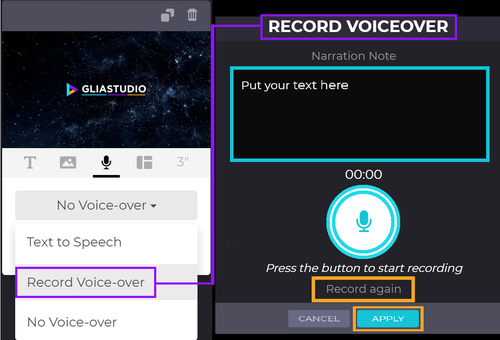
Step 1: Insert the narration note
Prepare the narration note ahead before starting to record the voice over. If you already have the text on subtitle section before, it will automatically insert on the “Narration Note”
Step 2: Start recording
Press the “…” button to start recording. Review your recording by press the same button once again. You can redo your work by click the same button to start the new recording. If you are pleased with the record result, you can proceed to the next clip.
Step 3: Save the changes
Be sure to click “Apply” before moving on to the next to save the adjustment that has been made on the video.
Text to speech
“Hey GliaStudio, I don’t have sweet or manly voice, what now?”
Good question! In case of that, GliaStudio will speak for you. If you are shy or not confident in your voice (but if you do have voice of angle, we recommend you to try out), what you can do is that provide content, pick a language and voice as you please and enjoy the result. Gliastudio’s text-to-speech feature will dub your content with automatic narrator voices. 100% automation process that synthesizes your text into speech. No voice recording required!! Narrator tones are available in five languages (English, Chinese, Korean, Japanese, and Vietnamese) and both genders to maximize the deliverable of your text article. Getting excited yet? Let’s head to the step by step instruction:
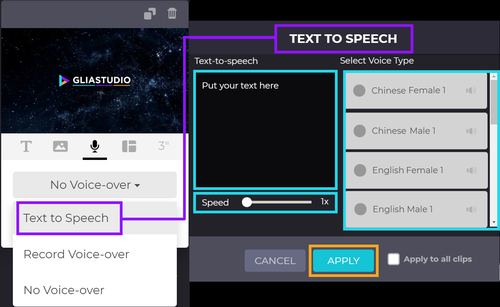
Step 1. Provide the text.
Insert the text or automatically turn your subtitles into a speech on the selected clip.
Step 2: Select the voice type
Select the narrator’s voice based on the language of your text. Make sure to fine-tune the speech by selecting the desired narrator’s tone and gender. You may also want to adjust the speed of the speech to fit your clip.
Step 3: Save the changes
Preview your clip online before proceeding or applying the result. You may continue editing the video with other additional features. Click “Produce Video” if you want to download the edited video. You can also share your edited video through the link provided.
Now you can make your video more special! Gliastudio still have many more cool features for video editing. Stay tunes to get more update about our feature. If you are new you can try out from our website and get the trial account in 14-days.
Free trial on GCP marketplace: http://bit.ly/GLIASTUDIO-ON-GCP
Request a demo: https://www.gliacloud.com/en/#request-demo
See you in next post!